Introduction
In the previous article, I covered the initial setup and testing AI.AGENT conversations on M5StackChan, the M5Stack-produced version of the open-source StackChan robot.
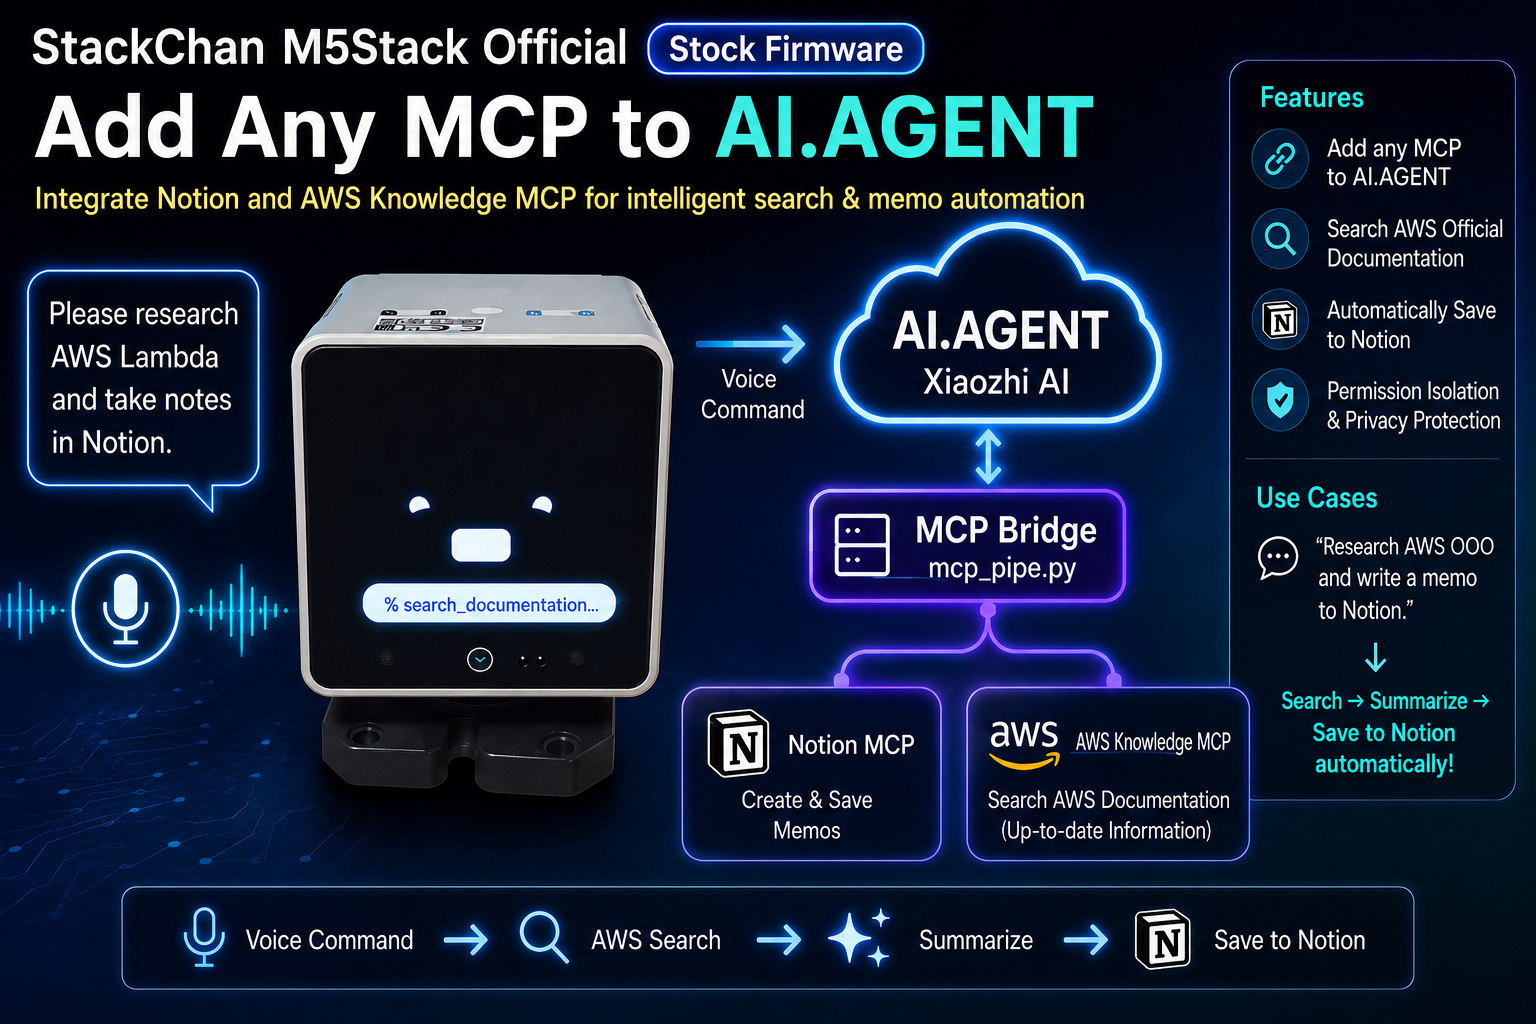
In this article, I connect custom MCP servers to StackChan's AI.AGENT to enable integration with multiple MCP servers via voice commands.
👱 User: "Look up [AWS service] and take a note for me."
🤖 StackChan: "Sure!"
- Search AWS official docs with AWS Knowledge MCP
- Generate a service summary
- Save to a Notion DB using Notion MCP
The AI.AGENT feature in StackChan's stock firmware officially supports Home Assistant as an MCP server for smart home control, but there is no documentation on connecting other MCPs.
After experimenting, I found that using mcp_pipe.py from the sample implementation 78/mcp-calculator — a repository for Xiaozhi AI — allows you to add any MCP server to the stock firmware's AI.AGENT.
This time, I'll add MCP servers to AI.AGENT to let StackChan search AWS services and take notes in Notion by voice.
Equipment & Environment
- M5StackChan
- Stock firmware v1.2.6
- Initial setup complete (see the previous article)
- PC
- Windows 11 (other OSes also supported)
- uv (for Python virtual environment and running MCP servers)
- Node.js (for running the Notion MCP server)
- StackChan official app
- Logged in with the same M5Stack account used for setup
- Used to obtain the MCP endpoint URL
- Notion account
- Integration created for MCP connection
- Dedicated memo DB (pre-created in Notion)
How MCP Server Addition Works
StackChan's AI.AGENT runs LLM-powered AI agent functionality on a service called Xiaozhi AI (小智 AI).
Overall Architecture

StackChan communicates with Xiaozhi AI, which connects to the local PC's MCP bridge (mcp_pipe.py) via WebSocket. mcp_pipe.py acts as a relay for locally running MCP servers.
Because of this bridging architecture, the MCP bridge must be running continuously while AI.AGENT is in use.
Tool Execution in AI.AGENT
StackChan's AI.AGENT comes with built-in remote MCP tools (weather, news, music, etc.) and internal tools using the device's hardware (camera, reminders, LED, screen brightness). These can be invoked by voice.
Hardware-based internal tools are defined directly as MCP tools in the firmware, while external tools can be added remotely.
In this approach, we add additional tools on top of these existing ones via the MCP bridge.
Adding Custom MCPs: mcp_pipe.py (MCP Bridge)
The official sample implementation for adding MCP tools to Xiaozhi AI-based agents is the 78/mcp-calculator repository. It demonstrates adding a simple Python FastMCP calculator tool (calculator.py) to the AI agent.
The most important file is mcp_pipe.py, used as the entry point. It acts as both an MCP client and proxy, bridging the WebSocket endpoint provided by Xiaozhi AI with locally running MCP servers. It supports any MCP server using stdio, SSE, or HTTP transport, not just local custom MCPs.
Adding definitions to mcp_config.json allows multiple MCPs to be launched simultaneously, deploying multiple tools with a single command.
Communication Method
The LLM runs on Xiaozhi AI's cloud servers. These cloud servers communicate with the ESP32 microcontroller to enable the AI chatbot functionality.
The WebSocket connection to Xiaozhi AI's endpoint allows MCP tools to be added from a local machine. The required endpoint URL is obtained from the official StackChan app.
Selecting MCPs to Use
Privacy Concerns with Xiaozhi AI
As noted above, StackChan's AI.AGENT connects to MCP servers via the Xiaozhi AI server. This server appears to be operated in China, and since the details of its terms of service and privacy policy are difficult to fully verify, care should be taken with data when using AI.AGENT mode.
Because data retrieved by MCP tools passes through the Xiaozhi AI server, this article selects MCPs on the premise of only handling data that would be fine to leak.
MCPs to Connect
We will connect the following two MCPs:
| MCP Server | Scope | Permissions | Risk |
|---|---|---|---|
| Notion MCP suekou/mcp-notion-server | Dedicated memo DB only | Read + Write | Limited (conversation content only) |
| AWS Knowledge MCP aws-knowledge-mcp-server | AWS official docs (public info) | Read (no auth required) | Low |
By going through the AWS Knowledge MCP, we can get answers citing the latest official documentation not in the LLM's training data.
Combining these two enables multi-MCP conversations like: "Look up an AWS service and take a Notion note about it."
Data Handling and Permission Design
The design policy is based on three principles:
- Minimize scope: Grant only the minimum permissions needed for reading and writing
- Minimize shared resources: Notion integration connects to only one dedicated memo DB
- Select data to handle: Only public information or conversation content with the user
Since the Notion API can only access pages/DBs where an integration has been explicitly added, restricting the integration to a dedicated DB prevents access to the rest of the workspace.
Creating a Notion Integration and Setting Permission Scope
Create a Notion API integration with access only to the dedicated memo DB.
Create a Dedicated Memo DB
To prevent access to private information, create a dedicated database for StackChan.
It is recommended to keep properties to a minimum for AI agent performance reasons.

Creating the Integration
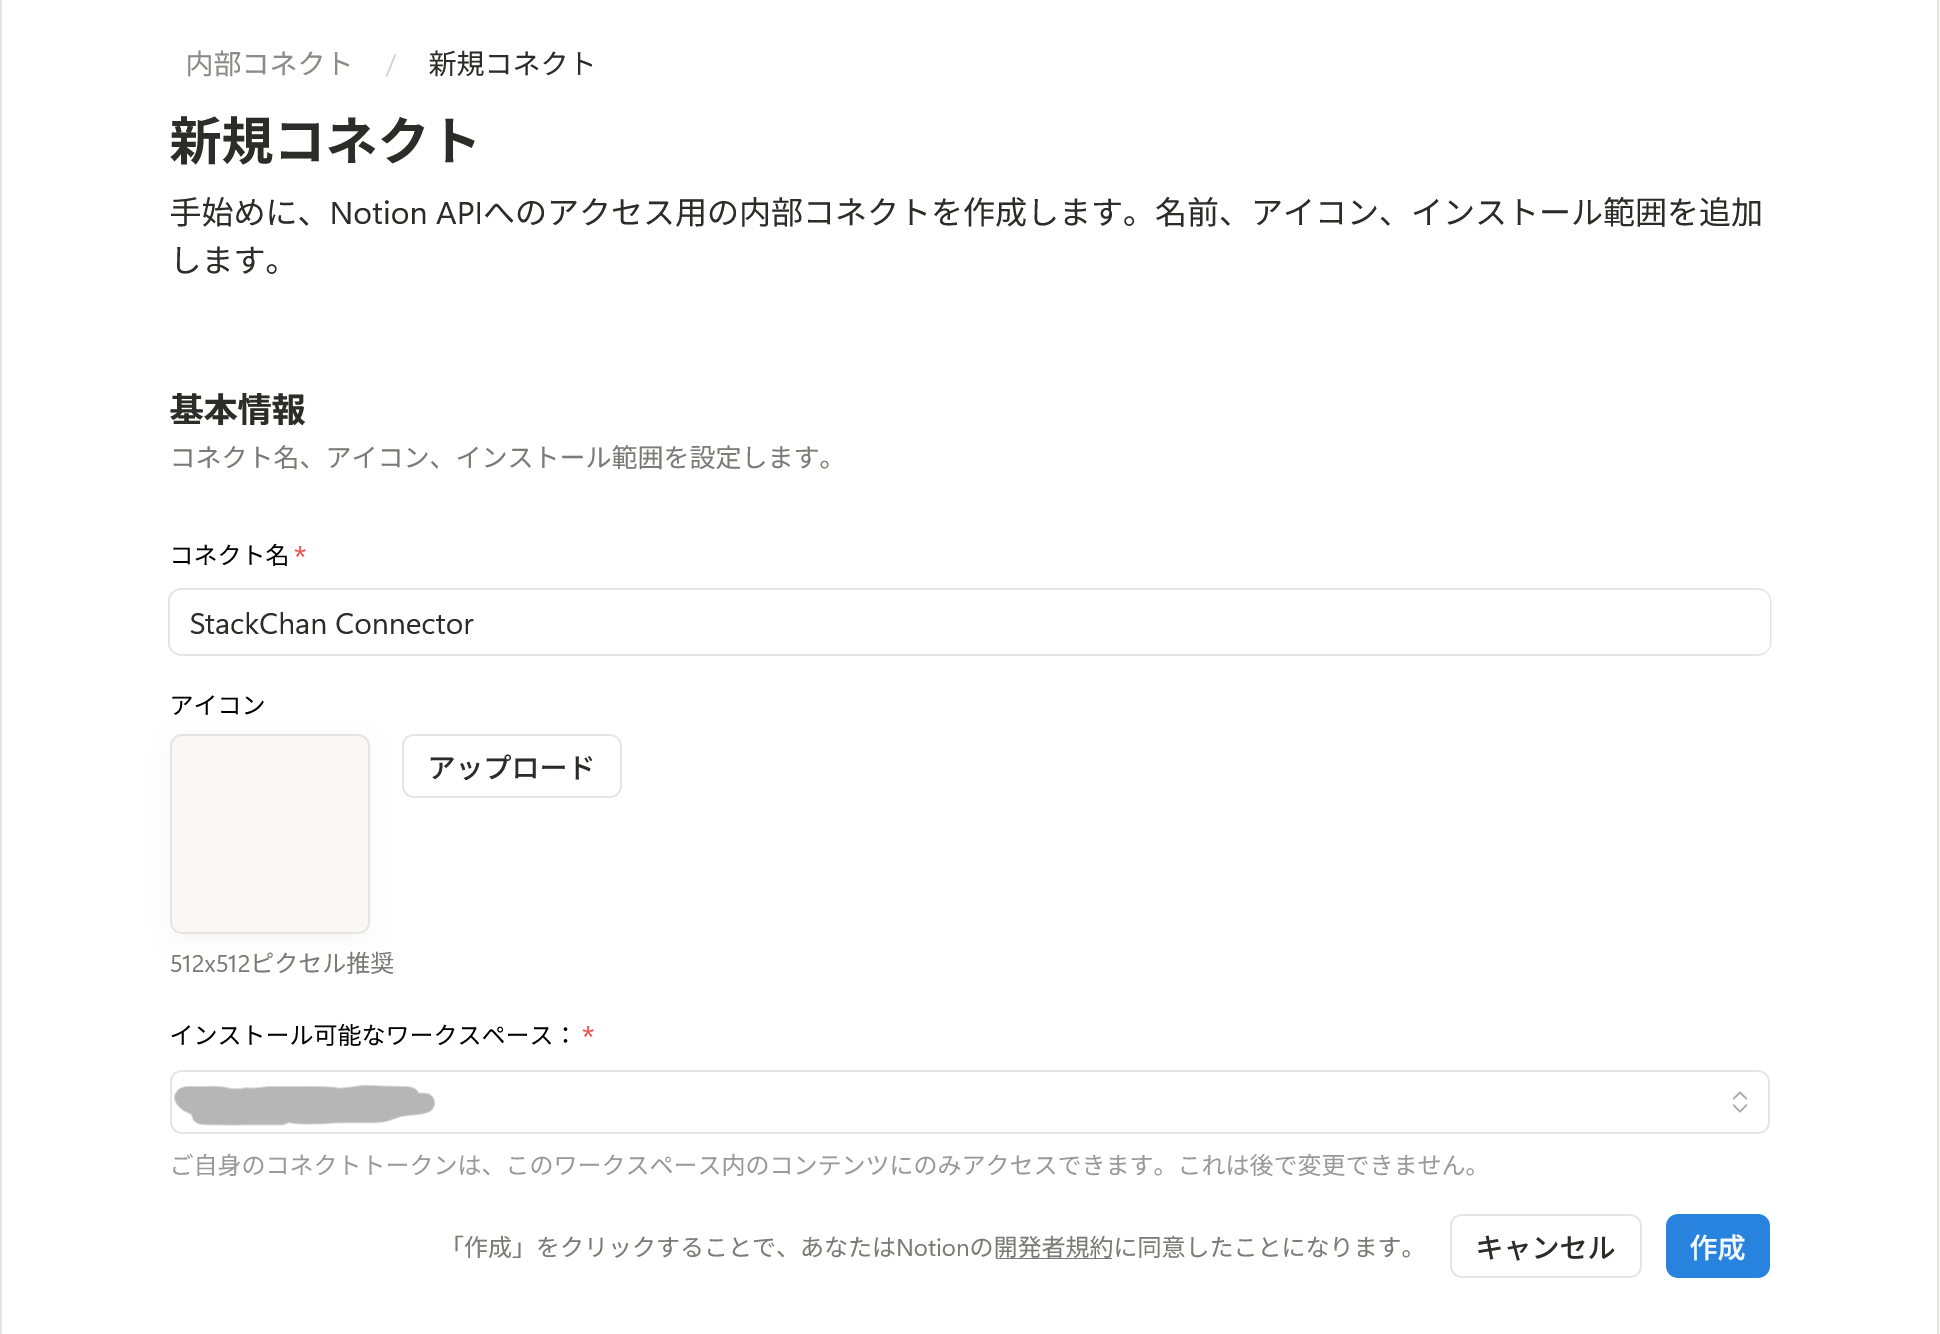
- Open Notion Internal Integrations and create a new internal integration
- On the creation screen: set a name and select the target workspace
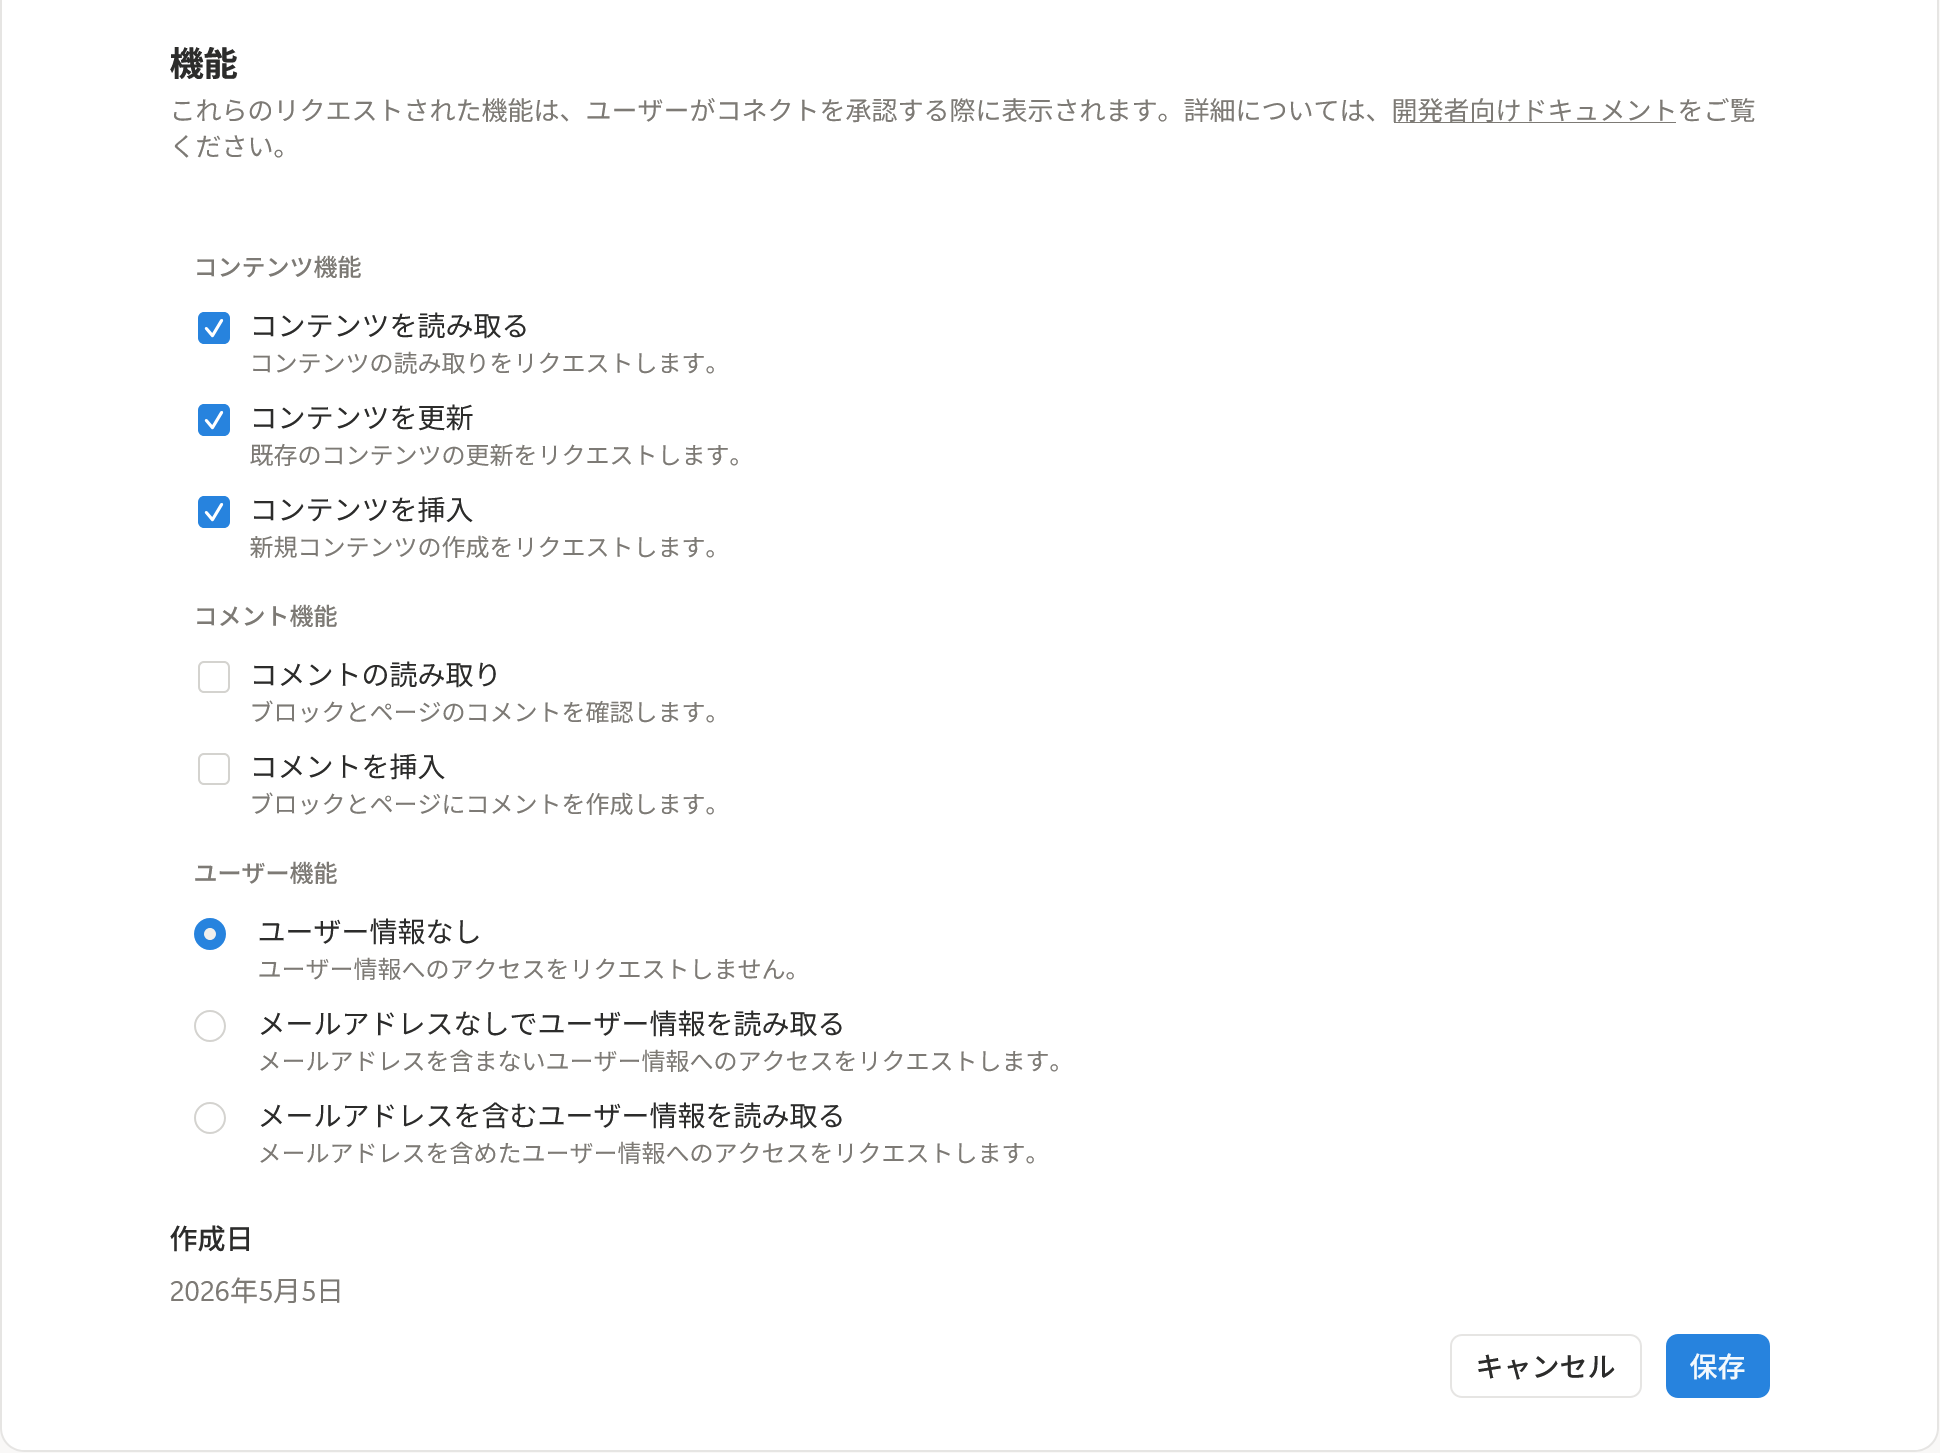
- Select required permissions: enable all content-related ones (read, update, insert) and disable others (comments, user info)
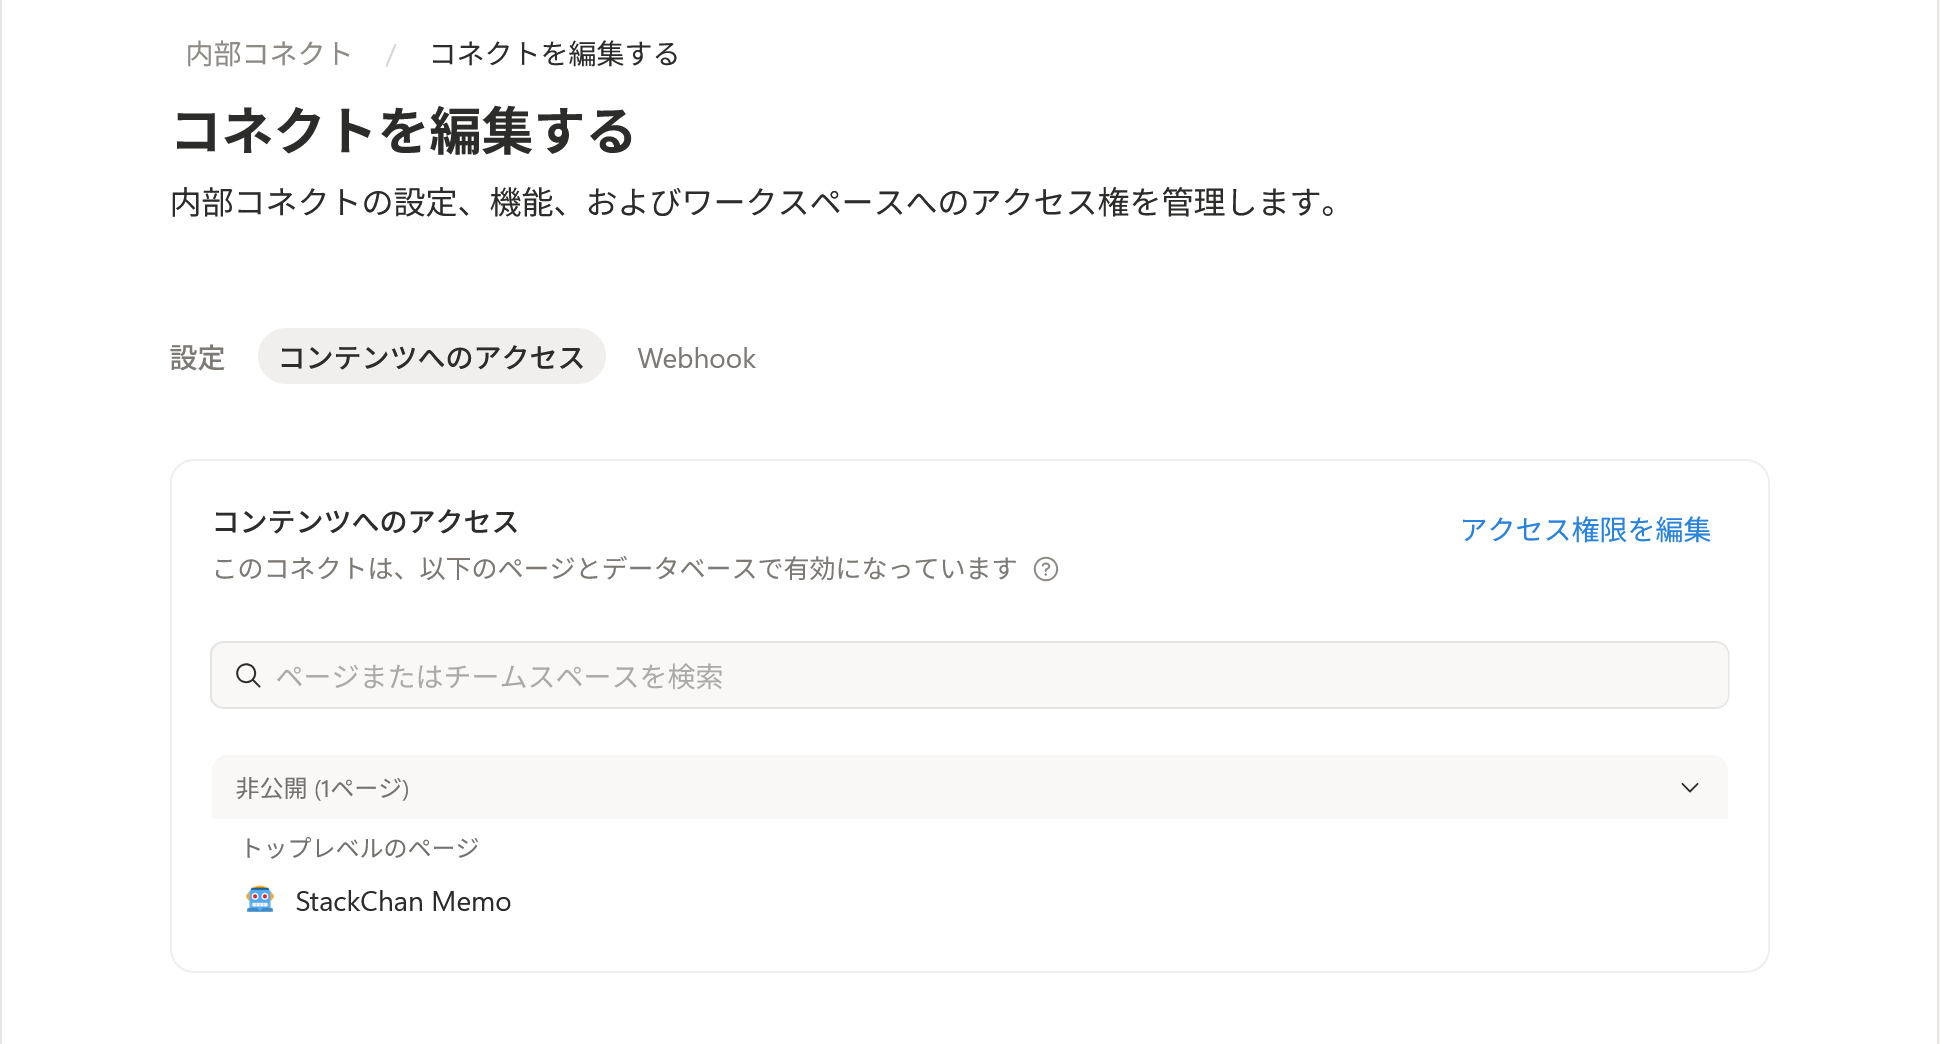
- Content access: add only the pre-created DB to the access permissions
- Copy the integration's access token (used when configuring the MCP server)


Obtaining the WebSocket Endpoint
The endpoint here is the WebSocket URL on the Xiaozhi AI cloud server side. mcp_pipe.py connects to this URL to establish the bridge between Xiaozhi AI and the local MCP bridge. Obtain the required endpoint URL from the official StackChan app.
- Launch StackChan World (official app)
- Open Settings tab → MCP
- Copy the Access point address (starts with
wss://)

Setting Up the mcp-calculator Repository
mcp-calculator is a sample project for adding custom MCPs to Xiaozhi AI. First, get this sample running as-is to confirm the calculator tool can be called from StackChan.
- Clone https://github.com/78/mcp-calculator
- Create a Python virtual environment and install dependencies from
requirements.txt(using uv in this case) - (The sample didn't run correctly without this) Explicitly install the
fastmcplibrarygit clone https://github.com/78/mcp-calculator uv pip sync requirements.txt uv pip install fastmcp - Create a new
.envfile and setMCP_ENDPOINTto the endpoint obtained from the official appMCP_ENDPOINT=wss://...... (obtained endpoint URL) - Edit
mcp_config.jsonto use uv{ "mcpServers": { "local-stdio-calculator": { "type": "stdio", "command": "uv", "args": ["run", "python", "-m", "calculator"], "disabled": false } } } - Start the MCP bridge and confirm no errors (keep it running until testing is complete)
The
local-stdio-calculatorMCP defined inmcp_config.jsonwill start internally and become available as a tool via the bridge in AI.AGENT.uv run python mcp_pipe.py - Launch StackChan's AI.AGENT and verify the calculator MCP works
Example: "Use a tool to calculate 3 plus 5" or "Pick a random number between 0 and 100"
- If the result appears after
% calculator...is shown on StackChan's screen, it's working correctly - From the official StackChan app under Settings → MCP, confirm the added tool names are listed
.C4mz5ut7.jpg)

Configuring Multiple MCPs
Set up Notion MCP and AWS Knowledge MCP to run locally and be accessible from AI.AGENT.
Xiaozhi AI Body Size Limit and MCP Server Selection
Xiaozhi AI has a body size limit on WebSocket messages. The official @notionhq/notion-mcp-server has too many tools, causing the following error after starting the MCP bridge:
MCP_PIPE - WARNING - [notion] Connection closed (attempt 3): received 1009 (message too big); then sent 1009 (message too big)This is likely because sending the MCP tool list definition fails. The solution was to use the community-made suekou/mcp-notion-server, which allows limiting tools with the --enabledTools option.
Editing mcp_config.json
Add MCP definitions to mcp_config.json. Use stdio transport. Since HTTP connection didn't work well for the AWS Knowledge MCP either, we connect via a fastmcp stdio proxy.
For the Notion MCP, only the necessary tools are specified with --enabledTools.
{
  "mcpServers": {
    // Add to the end of existing MCP definitions
    "aws-knowledge-mcp-server": {
      "command": "uvx",
      "args": ["fastmcp", "run", "https://knowledge-mcp.global.api.aws"],
      "disabled": false
    },
    "notion": {
      "command": "npx",
      "args": ["-y", "@suekou/mcp-notion-server", "--enabledTools", "notion_find,notion_read_page,notion_inspect_data_source,notion_create_data_source_item_from_values,notion_append_content,notion_append_markdown,notion_update_content,notion_update_block,notion_delete_block"],
      "env": {
        "NOTION_API_TOKEN": "Set your Notion access token here"
      },
      "disabled": false
    }
  }
}
Also, disable the sample calculator MCP if not needed (set disabled to true).
Starting and Verifying Registration
Run the MCP bridge and confirm that the Notion MCP and AWS Knowledge MCP tool lists are registered on the Xiaozhi AI side from the official app.
uv run python mcp_pipe.pyAdjusting AI Agent Settings
Before testing, change the AI agent settings.
From the StackChan official app's Settings tab → AI Agent Config, fine-grained settings are available. Make the following changes:
- LLM Model: Change to
DeepSeek V3.1- Switch to a more capable model to handle complex tool calls
- Personality:
- Normally used for defining the AI chat persona, but here used to input system prompt-like instructions to give the chat pre-loaded context
- For example, with the configuration in this article, write the Notion database name and ID to reduce unnecessary conversation and tool call attempts
- Example:
When the user requests to reference or add a memo, use a tool to access the "[pre-created DB name]" database in Notion. - Also describe any other rules you want the AI agent to follow
- Memory: Select
OFF- To prevent retrieval of unnecessary past conversation history (short-term memory)
- Mixing in past failed tool call context can be problematic; recommended OFF during trial-and-error for reproducibility

Note that the Personality text requires trial and error. Keep instructions minimal, as long text may be forgotten by the model.
Also, changes to AI agent settings require restarting AI.AGENT mode to take effect.
Testing
Here we verify the added MCP tools by having StackChan perform various tasks by voice.
Taking Notes in Notion
Talk to StackChan saying "Use a tool to take a note about [topic]" and verify that a page is added to the dedicated DB.
(If agent instructions haven't been added: say something specific like "Use a tool to add a self-introduction page to the DB called [DB name] in Notion.")
.CrI9-PqO.jpg)

There were some quirks — such as hallucinating non-existent URLs or stating today as its birthday — but no critical issues.
Test appending to a page as well. Pre-create a "Shopping List" page (empty is fine) in the Notion DB and say:
.CTLvvcdp.jpg)
.CkRLYJ89.jpg)

Researching Latest AWS Services
Have StackChan explain "Amazon S3 Files", announced in April 2026. Since this would be beyond the LLM's knowledge cutoff, using MCP is meaningful here.
(Adding "use a tool" and "recently announced" prevents the LLM from saying "No such AWS service exists" based on its training knowledge.)
.DsV1w4Aj.jpg)
.CHCD-NHh.jpg)
Taking AWS Service Notes in Notion
As a multi-MCP integration test, continue by requesting a Notion note:

Since multiple tools can be called autonomously in a single conversation, you can say the following to have it research the docs and add a page to Notion all at once:
Summary
I added voice-activated Notion note saving and AWS official documentation lookup to StackChan's AI.AGENT mode using MCP.
Using mcp_pipe.py, any MCP tool can be added, with broad extension possibilities limited only by imagination.
Limitations of Using the Stock Firmware
The configuration in this article is based on the stock firmware, which requires using Xiaozhi AI as-is. Given that we cannot fully verify the terms of service, connecting personal data is not recommended.
To avoid sending data to Xiaozhi AI's servers, one of the following approaches is needed:
- Rewriting to a community-published alternative AI agent-compatible firmware
- Modifying the stock firmware source to replace the AI service
- Self-hosting the backend including the AI agent execution environment (Xiaozhi AI cloud server)
For handling more private data, one of these approaches is currently necessary.
Future Plans
By modifying the firmware directly, additional MCP tools using the device's hardware can be added. I'd like to explore extending functionality using the various built-in but unused sensors (infrared, NFC, etc.).
At the time of verification, only an older firmware version was available, but during the writing of this article, the source code for the latest firmware (v1.3.0) was published in the StackChan OSS repository, so I plan to continue verification using that.
References
- 78/xiaozhi-esp32 (GitHub) — Xiaozhi AI library for ESP32 (used in stock firmware)
- 78/mcp-calculator (GitHub) — Sample implementation of Xiaozhi AI MCP bridge
- suekou/mcp-notion-server (GitHub) — Community Notion MCP implementation (supports
--enabledTools) - aws-knowledge-mcp-server — AWS official documentation search MCP
- StackChan Official Documentation from M5Stack
- StackChan OSS Repository — M5Stack official version stock firmware
